Have you ever heard Shimanami Kaido? It is one of the most beautiful place in Japan. I’ve done camping and 70km walking trip. If you want to know about travel, nature and camping in Japan, please check out!
Click below to check out more! Or simply scroll down for details.
- Where is Shimanami Kaido?
- Fees and how to get there
- where you camp and schedule
- List of gears
- Great advices before you go!
Where is Shimanami Kaido?
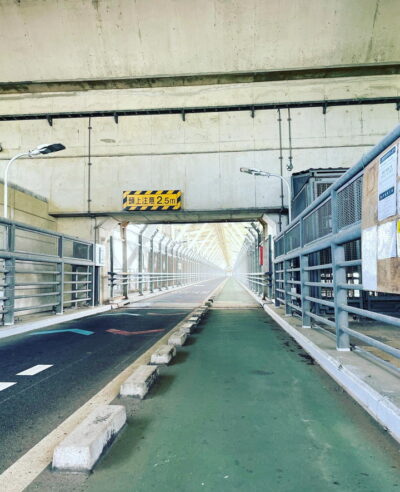
Shimanami Kaido is the way connected between Hiroshima and Shikoku in Japan. You have three ways To get to Shikoku on the ground, and Shimanami Kaido is one of it.
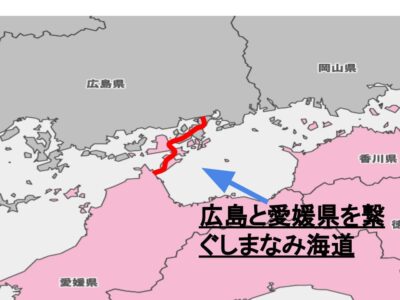
Basically it is a high way connecting some of islands in between Hiroshima-Ehime . Does it free? Don’t worry, as long as you go by walking, bicycles, and 50cc mortar cycles, you can access free without using the high way which means no cost except a 50cc mortar cycle(¥50).
Some island have ferry access that you can take your car, but it is not all islands, so normally you need to get high way going across by a car.
Off course, you are able to get off the high way at each islands anyway.
Well, fees for non driver are free for bicycles and walkers, and a 50cc mortar cycle is ¥50e at each bridges. *might change in the future
To make a payment, you just need put money into a box that located on the bridges
This time, I’ve done walking 70km from Hiroshima to Ehime, but seems like bicycles are more popular there. There are a couple of places that you can rent a bicycle, and I saw many bikers along the trip
I would recommend a rental bicycles, and definitely I would use a rental bicycle next time.
Fees and Access
As I explain above, there are some ways going to Sikoku, and Shimanami Kaido is one of the ways. If you going to Shikoku from Hiroshima, you should get to Onomichi station first. Actually I started my trip from Onomichi station.
①way from Hiroshima to Onomich stationA bit confused point is there is Shin Onomichi station. However, it is a bit far away from starting place of Shimanami Kaido. If you coming from Osaka direction, you might change a train line to Sanyo line at Fukuyama Station
I went from Hiroshima station which is completely opposite direction of Osaka, and I got to Itozaki station ,then I changed a line to get to Onomichi station.
Fees from Hiroshima station to Onomichi station was ¥1520, and took about 2hr. If you want to get faster, you can take Shinkansen to get around Onomichi station.
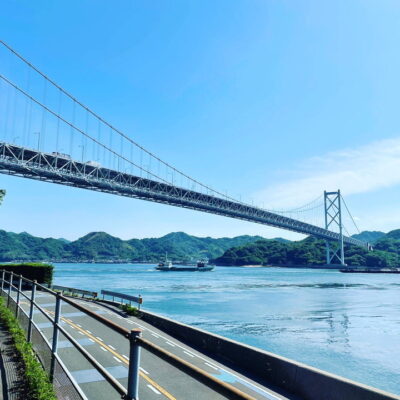
②Getting out from Shikoku 「Imabari→Okayama」Going to Imabari in Ehime to Okayama station is about 2hr using a rapid train. This one going across the huge bridge called “Seto Ohashi” which is one of three ways connected to Shikoku.
It is a rapid train, so a bit pricey that is ¥6270 en. That is going pass from Ehime, Kagawa, and then Okayama. At this time my schedule was tight, so I would take a time to see around there next time.
| fees | time | |
| Hiroshima➨Onomich(From Hiroshima) | 1520yen | about 2hr |
| Fukuyama➨Onomich(From Osaka and Okayama) | 420yen | 20 minitue |
| Imabari➨Okayama(Out from Shikoku to Okayama by trains) | 5540yen | 2hr and 15min |
Schedule and Camp sites

Shimanami Kaido is the way connecting each islands, so there are many camp sites because of the huge area. However, some sites are far away from the high way. If you want to get those sites, you may need a car or a rental bicycle.
This time, I had limited option to camp because of walking with a backpack and schedule.
I’ve done a two night three day camp trip. I walked about 20-25km on each day took me about 7-9hours. I’m a bit regret that I should take more time.
Right here, I’m writing about where I camped in Shimanami Kaido ↓
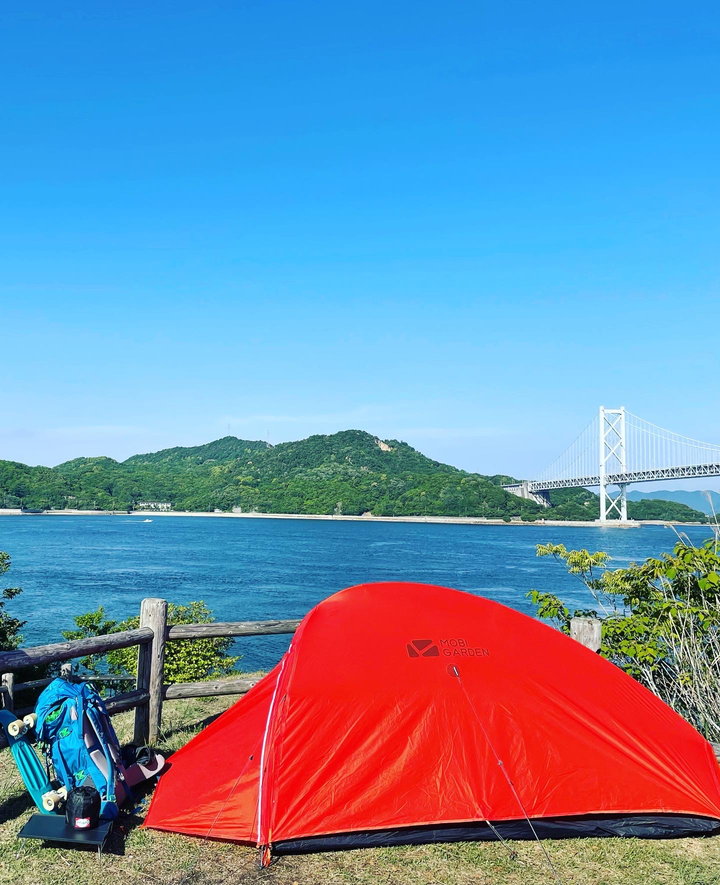
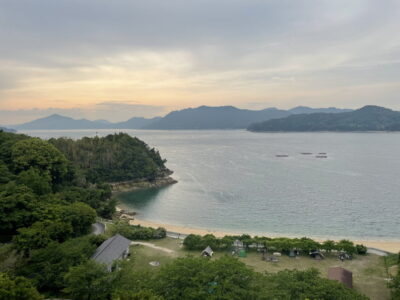
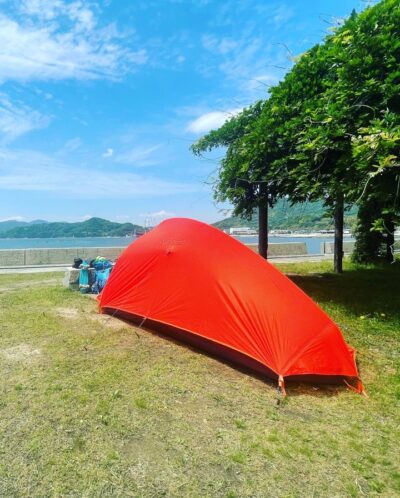
Ohamasaki Camp site

Ohamasaki Camp site is located right after the south side of the bridge that connecting Innoshima and Mukaishima .To access there on your feet, there is stars just near by the bridge.
You would get great view of the sea and a bridge. They have two big site that you can pitch your tent anywhere and 10 individual sites.
For reservation of this camp site , it changes by seasons. Except July and August, you need to call to regional department, and you need to tell your name and address, then they will send you payment form. That may be hard to non Japanese that don’t have an address in Japan.
When I camped, there were only two groups of people, and that was on May! I could literally camp anywhere.
This is summary of Ohamsaki camp site.
| Address | 722-2101 Ohamsaki Camp site, Ohamasaki cho Innoshima Onomich City, HIroshima |
| fees | ¥1020/ tent ¥520/ solo tent ¥100 day camp/ person |
| Reservation | On July and August, go to office on camp site. Except those months, call to regional department on website |
| website | https://www.city.onomichi.hiroshima.jp/soshiki/38/46196.html |
| parking | Yes(you need to walk up 30m) |
| toilet/restroom | Yes |
| water | Yes |
Michikashima Camp site
On the day two, I camped at Michikashima camp site which I desired to camp here
This is the one of camp sites that limited people know. The reason why this is so unique is the way of access to Michikashima. Only walker, biker, and 50cc Moyer cycle are able to access to this small island.
I camped on weekday, but there were more than 10 campers. That area of this camp site is not that huge, and I felt a bit tight space even there were only 10 people. If you want to go, I would strongly recommend to get there as early as possible.
How to get there, and detail of the camp site are on other article. Please check out!
| Address | Access from Oshima bridge |
| fees | free |
| Reservation | No booking, first come first served |
| website | https://www.city.imabari.ehime.jp/kanko/spot/?a=187 |
| parking | No parking space. but you can park beside your tent(free parking) |
| toilet/restroom | Yes |
| water | Yes |
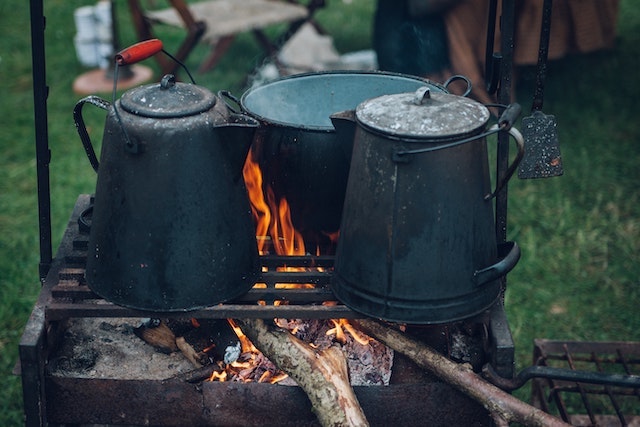
Introducing List of Gears
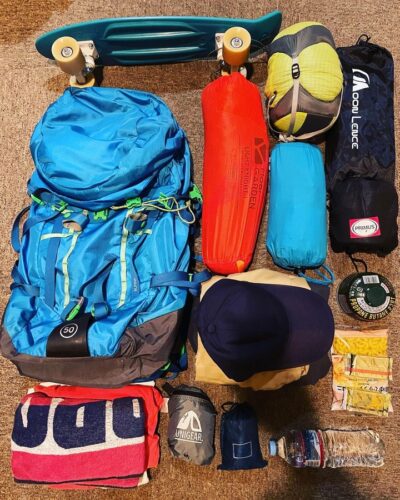
This is a part of my gears I brought to a camping trip.
In this time, I needed to walk up to 70km in three days, so I tried to chose and pick lighter gears which are sometimes called ultra light gears. However, the gears I have are not all lighter gear, therefore I made up by physical fitness.
Introducing gears and some special items below↓
・Mobi Garden light knight 1/1 (solo tent)
Light, small, and great quality tent for backpack camping. I bought this at Amazon. Some of them may know, high end ultra light tents are all pricy, but this is only about ¥15000-¥17000 which is kind of affordable price. This is not the lightest one obviously, but only 1.5kg including ground sheet, pegs, poles and tent itself.
・MEC Air mattress
Air mattress is great for its portability. Canadian brand Mountain Co-op Equipment sales a good air mattress. This is reasonable price but good spec item. If you visit in Canada, you should go the shop!
・MEC sleeping bag
MEC sleeping bag. I would like to get new one because this is old and the weight is not helpful for backpack camping although its size is great.
I bought this in 10 years past. A MSR pocket stove is incredible. Need to use gas cylinders. One negative point is that MSR is not famous as same as North America, and i don’t see many MSR gas cylinders in Japan.
・Moon Lence table
Aluminum low table. This is reasonable price and have no issues for heavy use. I use to put this beside chair and this would be good for drink placer. Also, good for solo camping because of light weight.
・Primus Aluminium cooker
This is also 10 years old aluminum cooker. I used many time, then it turned to dark color. No problem for use anyway. This is so useful to cook ramen or boil water, and just fit a gas cylinder in.
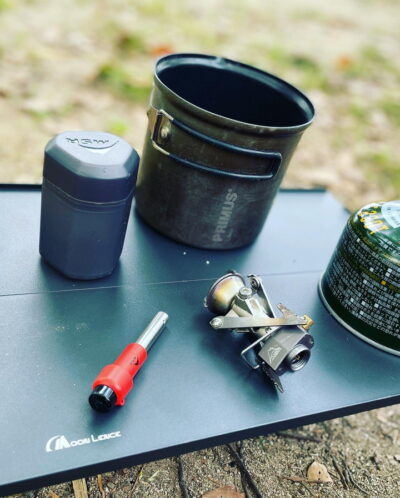
Blue backpack on the picture above. I got this backpack 10 years ago, so not a brand new item, but I can still use this. This is alpine backpack without zippers and small porches on side or its hip belt. Nevertheless, this has great water proof function, and its weight is about 1.8kg.
・rain cover for backpack
I didn’t use this time, but i brought a rain cover for 50L backpack which I got this about ¥1000 at Amazon as well.
・Portable bag
After camping or before, you may need a bag for casual use. This portable bag is useful. Just put your water and wallet in and enjoy to walk around a camp sites. its weight is only under 100g and not pricey item.
Japanese outdoor brand “Mon-bell” sells small mini lanterns. This is able to change a quantity of light easily.
・Anker 20000(mobile battery)
It is common that you can access to power for a while. I had a mobile battery which is from Anker. Anker is quite famous maker that dealing with electronic tools. This 20000mAh ver is able to charge your phone for 4-5 times. A bit heavy for backpack camping anyway!
・Penny Skatebord
This is a special item in this trip. Simply I just thought that it would be fun if I brought a skateboard into a camping trip. Penny is a light skateboard even thought it is about 2,3kg which was a bit heavy to bring. However, that was great to skate and walk along the ocean.
I will summarize about ultra light gears and weight of backpack camping in an another article. Please check that one out!
Some Great Advises Before You Go
①Make sure you have done fee estimate ahead!
Traveling is sometime pricey as you know. Therefore, you should estimate fees for foods, bus, train, and hotel before you go. That make your expense lower. For your reference, my expense for this trip is below↓↓.
As a transit fee for a train from Hirosima to Onomich station, it took 7000 yen. For foods, I spent 2000 yen of instant noodles and 4000 yen of foods that I had there. Also, the hotel I stayed was about 4000 yen. Total 17000 yen at least was my cost for this trip excluding transit fee for going back and camping fees.
To think about buffer, you might cost 20000 yen to go and stay Shimanami Kaido. Off course, I spend more money for train going back and buses, so 20000 yen wasn’t enough for my case.
②Trip schedule and emergency access
Shimanami kaido is 70km long which you need 2-3days at least. If you want to take a look around at each islands, you definitely need more days like a week.
To access each islands, you can take a ferry, and some islands have limited access by cars. This is website for ferries for Shimanami Kaido, so please check here!
https://www.oideya.gr.jp/accessibility/shimanami02.htm
This could be used for emergency situation like some accident and herts on your trip. Just to remember that you can take ferry or taxi. Also, you need to bring and charge mobile charger for your phone!
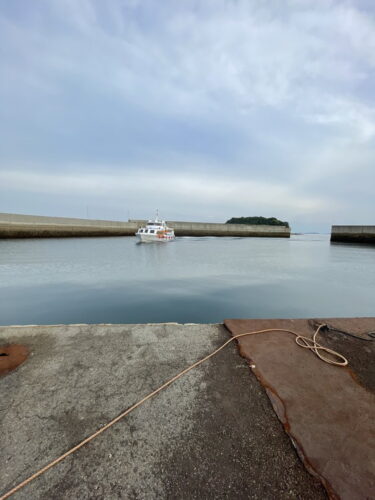
This is a picture of ferry going to Imabari. The ticket is sold in an hour prior to departure time.
③ Water and Foods
There are many bending machines, so you don’t have to worry about water problem. just bring a lot of coins for buy. A store is not located at each islands, so you need to care about foods rather than water.
You will eat many instant foods on back pack camping, so take care about your health by taking dried vegetable or energy bars. Estimating calories you need in a day is necessary as planing stage.
④Choosing right backpack and your physical strength
Choosing a backpack that fit to you is needed to walk 70km with in a couple of days. You can walk any backpack for a first day, but no more than 2days for sure. You put some weight into backpack on most shops when you try. Highly recommended to try weight.
Also, knowing your physical strength is one of things. You need to walk more that 10km in a day which means that you need to do some walking or running before that trip.
That was all about my trip and recommended tips for anyone going to Shimanami Kaido. If you have question, please contact us. We are welcome to answer any inquires.
Back to Home Page