Have you ever heard of fish hook accessories? Some people may not know about it because it is not a familiar accessory in Japan. It is an accessory in the shape of a fishhook necklace, which is famous in tropical countries and is sold as a souvenir or special product. The meaning of this accessory changes depending on the material used, and its appearance is very outdoorsy!
This time, I made such a fishhook accessory by myself as a DIY project, and I’d like to talk about the details and my impressions!
- What are fishhook accessories?
- About Bone Carving! About the types of materials
- Actual DIY and difficulty level!←Important ★★★★
- How to buy and advice for those who want it
What are fishhook accessories?

Fishhook accessories are a type of necklace with a fishhook-shaped ornament. It is a famous accessory in Hawaii and other tropical countries, and was traditionally worn by fishermen and sailors.
In fact, the fishhook accessory has a meaning. It is a fishhook-shaped ornament with the meaning of hooking good luck. It also has the meaning of hooking one’s life and protecting one ‘ s life by placing the hook in the direction of one’s heart. It also has a meaning as a safety talisman.
![[商品価格に関しましては、リンクが作成された時点と現時点で情報が変更されている場合がございます。]](https://hbb.afl.rakuten.co.jp/hgb/44b2ee1a.d40d6f45.44b2ee1c.fc10da4d/?me_id=1379432&item_id=10000012&pc=https%3A%2F%2Fthumbnail.image.rakuten.co.jp%2F%400_mall%2Fneshexst%2Fcabinet%2Fko-nakurannpu%2F08949417%2Frakutensamune_old.jpg%3F_ex%3D240x240&s=240x240&t=picttext "[商品価格に関しましては、リンクが作成された時点と現時点で情報が変更されている場合がございます。]")

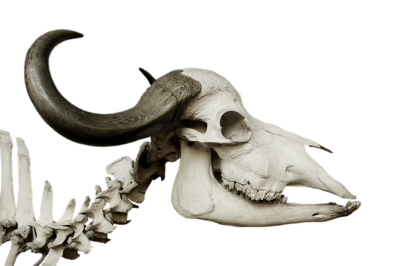
The materials used vary, but they are made from shells, large fish bones, dolphin bones, buffalo bones, and other animal bones. Crafts made from animal bones are also called bone carving, so it is safe to say that fishhook accessories = bean carving.
This time, I decided to try handcrafting (making by myself) such a fishhook accessory, so I purchased buffalo bones on the Internet. Please see below for the details of the handcraft!
About Bone Carving! About the types of materials
Since I mentioned bone carving earlier, I will explain a little about it as well. The word and meaning of bone carving is “to carve bones. Bone carving is the process of working animal bones and horns to create accessories, tableware, crafts, and other items.
Bone carving itself has been a tradition in countries around the world, from fishhook accessories in island countries to tableware made from deer and buffalo bones and antlers in continental countries.
![[商品価格に関しましては、リンクが作成された時点と現時点で情報が変更されている場合がございます。]](https://hbb.afl.rakuten.co.jp/hgb/44b2f1c4.15fb3790.44b2f1c5.9ad3be54/?me_id=1243991&item_id=10001009&pc=https%3A%2F%2Fthumbnail.image.rakuten.co.jp%2F%400_mall%2Fkoyama88%2Fcabinet%2F06458958%2F07779619%2Fimgrc0096811122.jpg%3F_ex%3D240x240&s=240x240&t=picttext "[商品価格に関しましては、リンクが作成された時点と現時点で情報が変更されている場合がございます。]")
The author has also experienced processing spoons from deer antlers in an aboriginal town in Canada, and has also heard that they are neatly shaved as they are and used for amulets, knife sheaths, and other purposes.
The most famous bone carving materials are cow bones and buffalo horns. There are different types of buffalo horns: black, yellow, and white. This depends on the type of buffalo, and even black buffalo horns can be whitish depending on the individual.
Shark teeth are the next most famous. There are many types of sharks, and the size and shape of sharks’ teeth vary depending on which shark’s tooth is used. Shark teeth are often made into pendants.
Other examples include wolf teeth and deer antlers. Since each animal has a different meaning and motif, you should research carefully before purchasing a bone carving fire-work product. Also, since many of them are one-of-a-kind, the prices are very different.
Actual DIY and difficulty level!←Important ★★★★★
Now, here is the main issue. This time, I actually bought a buffalo bone online and processed it! I will describe the price and difficulty level.
Processing method 1) Cut buffalo horn into round slices.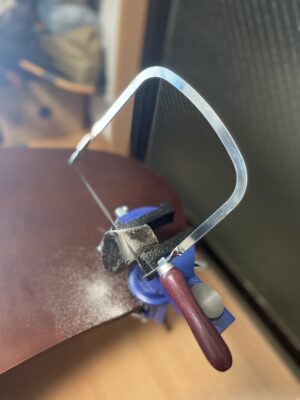
This time I purchased a buffalo horn about 7 cm X 7 cm in diameter and 7 cm long. There were some that were cut into rounds, but this time I purchased a whole part of the horn and cut it into rounds myself. I think I can make about 7 pieces of accessory material with just this part of the corner.
Processing method 2: Cutting and molding shapes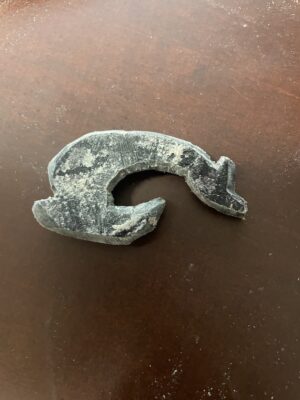
After cutting the material into round slices, the oval-shaped material is cut out and roughly shaped using a thread saw and a saw. After this, the material is filed down with an iron file until the desired shape is achieved. During processing, a lot of powder was produced, so I needed newspaper and a vacuum cleaner.(or do it outside).
Processing method (3) Polishing with a file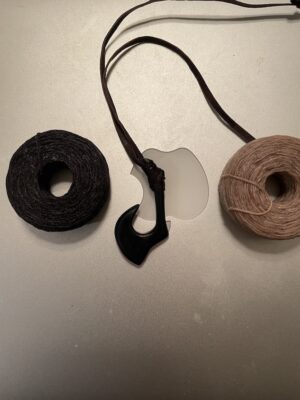
Once the desired shape is achieved, polish it with sandpaper. This time I used #100, #320, #800, #1200, and #2000.In my opinion, #100 was too rough and I hardly used it. Once the roughness is removed as shown above, the rest can be polished with a higher number of sandpaper. 2000 or more may not be necessary.
For the necklace material, I chose a leather strap. For the connection part, I bought a type of thread called “waxed thread,” as it seems to be commonly used for this purpose. Both were sold at a store near my house that sells handicrafts. If you don’t have a neighborhood or a place to buy them, you can buy them online.
There is a knack to tying the loubiki line, and the author is still in the process of improving, but I have referred to Youtube and other sites for reference.
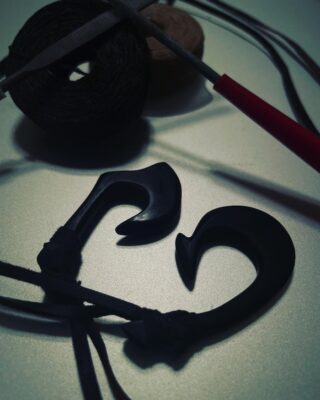
Processing method 4: Finish as a necklace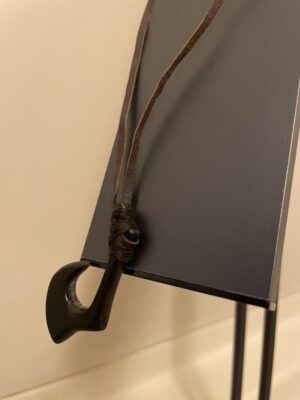
The above is the final work! The use of sandpaper in the 2000 series has brought out the natural luster. There is still room for improvement in the way of tying the joints and the necklace material, so we are looking forward to seeing more improvement in the future.
Now, as for the price, I spent about 5,500 yen for a piece of buffalo horn this time. Other costs include a vise, an iron file, and sandpaper, all for about 5,000 yen. Leather straps and waxed threads can be purchased for about 1,000 yen for a total of various items.
What do you think? Surprisingly, the materials are inexpensive. However, it took me at least 10 hours to make one of these accessories. Of course, it was my first time and it was a trial-and-error process, and that time is also one of the charms of handcrafting because it is a fun time to immerse yourself in the craft.
![[商品価格に関しましては、リンクが作成された時点と現時点で情報が変更されている場合がございます。]](https://hbb.afl.rakuten.co.jp/hgb/44b2f3b5.726ee547.44b2f3b6.1d1a8923/?me_id=1387373&item_id=10002288&pc=https%3A%2F%2Fthumbnail.image.rakuten.co.jp%2F%400_mall%2Fhoshinoweb%2Fcabinet%2F07932252%2F11706738%2Fimgrc0103062465.jpg%3F_ex%3D240x240&s=240x240&t=picttext "[商品価格に関しましては、リンクが作成された時点と現時点で情報が変更されている場合がございます。]")
Of course, I felt that I could have made detailed decorations more quickly if I had used electric tools and equipment, but as a DIY/handcraft, I thought it would be best to do the processing by myself, so I gave it a try.
If I can make a better product in the future, I will try to sell it on this website, so please consider purchasing it if you are interested!
How to buy and advice for those who want it.
If you want fishhook accessories, they are a little pricey, but I found it best to actually make them and buy them online or in stores. They are sold on numerous websites, including famous and personal sites. I have the impression that most of the more elaborate designs are sold on the major sites.
If you want actual local fishhook accessories, try looking at them locally when you travel abroad. They seem to have simpler designs than those sold on the Internet, but they may also be less expensive.
It is also interesting to make your own, as I did, but I do not recommend it. It requires a certain amount of patience, motivation, and time. If you would like to give it a try, please feel free to ask questions through the contact form on the site, and we will answer as many as we can!
If I were to give advice to those who want to make one, I would suggest that you buy buffalo horns cut into rounds. It was the hardest part of the process to cut them into rounds from the whole horns. Also, you will have a lot of dust, powder, and scraps, so choose a place and environment where you don’t mind getting dirty.
Surprisingly, there were no articles on DIY fish hook accessories, so I hope this will help those who try it in the future!
back to homepage